
Don't you just love the fresh feeling of a new year? It's like a blank slate covered in hope, ready for the pen of your heart to write all manner of plans and dreams! I don't know about you but plans are hard for me to make and keep, as I am more of a dreamer and as such, my plans continually change!

One of the dreams I've had for a while, but haven't succeeded in producing a solid plan, is to start a series of free amigurumi patterns and modifications for your favorite kawaii characters! By pattern modifications, I'm talking about a few simple changes to an amigurumi pattern you purchased in one of my shops.

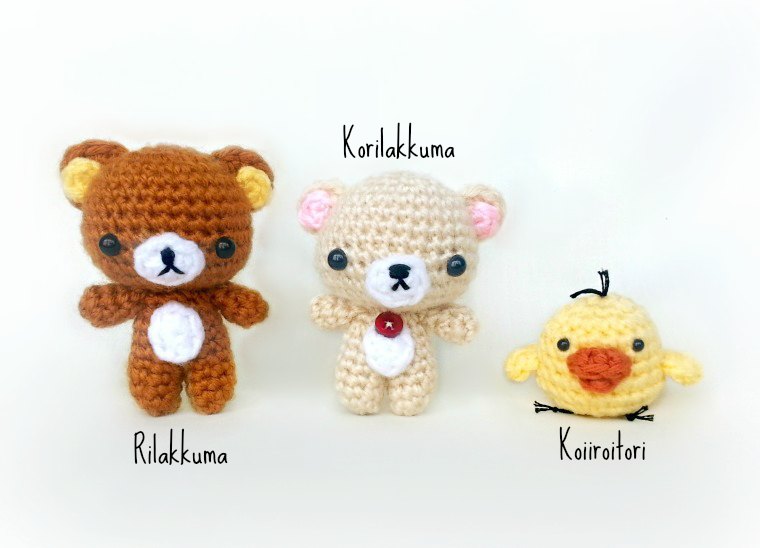
Rilakkuma is a character produced by the Japanese company San-X. His name is a combination of the word relax and the Japanese word for bear. As his name implies, Rilakkuma loves to relax and be very lazy. He enjoys laying around, sleeping, watching TV, soaking in hot springs and listening to music.
His friend Korilakkuma is is a younger, smaller bear hence "Ko" which means child in Japanese. She is an energetic and mischievous friend who enjoys playing tricks on Rilakkuma while he is sleeping, like drawing on him and sewing odd colored patches to his clothes!
Kiiroitori is a chick who lives with both the bears. He is a sensible and very mature bird, often scolding Rilakkuma for being too lazy and Korilakkuma for being too naughty. He's the opposite of Rilakkuma with his hard working nature and love of cleanliness.
Cutie Pattern Modifications
 |
| Cutie Pattern Link |

The pattern for the "Belly and Nose" is as follows, make two:
Belly and Nose
In a MR, sc 1, hdc 2, sc 2, hdc 2, sc 1. Sl st to close. [8 sts total]
Pull the ring closed tightly, cut leaving a long tail for sewing. Sew the first one to the body. Use black embroidery thread to sew a small nose and mouth on the second one. Sew on to the Head in the same fashion as the Belly.
The pattern for the "Inner Ears" is really simple, but this one feature is so defining for Rilakkuma, he's just a regular bear without them!
Inner Ears
In a MR, sc 4 times.
Make 2. Pull ring tightly closed and cut a long tail. Sew the Inner Ears onto the Outer Ears and Head, before or after the Ears are attached - which ever way is simpler for you!
Kiiroitori's Free Amigurumi Pattern

Materials You'll Need:
• A small amount of yarn, I used Impeccable Loops & Threads in Yellow and Orange
• Crochet hook - D to F depends on yarn weight
• Stuffing - Polyfil
• Yarn or Darning Needle
• Scissors
• 2 - 4 mm safety eyes
Stitch Pattern Key
Rnd - Round
MR - Magic Ring (magic circle, magic loop)
st - Stitch
ch - Chain
sc - Single Crochet
dc - Double Crochet
hdc - Half-double Crochet
Sl st - Slip Stitch
inc - Increase (two sc in one)
dec - Decrease (Invisible Decrease recommended)
[##] - Number of stitches in Round
( ) x 6 - Repeat action within ( ) 6 times
Notes: Finished Size: 1.5" x 1.5" (3.5 cm x 4.5 cm) ❤ I use the joined-round method of amigurumi, most people do not. This pattern works for both spiral and joined rounds, use the method you are most comfortable with.
Kiiroitori
BODY
Rnd 1: In a MR, sc 6 [6]
Rnd 2: (inc in each st) x 6 [12]
Rnd 3: (inc then sc 1) x 6 [18]
Rnd 4-6: sc in each st [18]
Rnd 7: (sc 3 then Inc) x 4, sc in last 2 sts [22]
Rnd 8: Sc in each st [22]
Rnd 9: (sc 2, then dec) x 5, sc in last 2 sts [17]
Place 4 mm eyes 4 holes apart, between Rnds 4&5
Rnd 10: (dec then sc 1) x 5, dec last 2 sts together [11]
Stuff firmly.
Rnd 11: Dec around, sc in last st. [6]
Tie off, finish stuffing, and close hole.
WINGS
Rnd 1: in a MR: sc, hdc, dc 2, hdc, sc, sl st. [7]
Pull ring closed, cut thread leaving a long tail. Make 2 and sew to opposite sides of body.
BEAKS
Top Beak (larger sized)
In a MR: sc, dc 3, sc. Sl st, Tie off.
Bottom Beak
In a MR, sc 3, sl st and tie off.
Sew top on first, between eyes. Sew bottom on next, as close as you can, underneath the top beak. With black thread, add hair, legs, and nostrils . And you've finished Kiiroitori!
I hope you enjoy his little pattern and the modifications to making your own Rilakkuma set! I know I did :) If you have any questions, please let me know in the comments below or send me an email and I'll do my best to reply quickly. Remember, your comment won't appear until it's approved. This blog receives a lot of spam comments and I do my best to keep Ami Amore clean and happy :)
Thanks for stopping by! Enjoy~

As this is an original Ami Amore pattern, kindly do not claim it as your own. You may place a link to this pattern from your site, but please do not repost it onto your page. Share a picture of your own Rilakkuma set with everyone on Facebook, we'd love to see your finished work!
OMG. Those little Narwhals are the cutest things I've EVER seen! If you take requests -- but this one might be tough -- I would respectfully request consideration of the Sea Horse. And if the Sea Horse and the Narwhal were allowed to get to know one another, who knows? You might be on the verge of invented the Sea Unicorn!
ReplyDeletelol! Thank you so much Heather! I've thought about sea horses before, and boy that would be a tough one!! I'd want to make it small and cute, hmm... I might have to give this a try!! Thank you for the request, I'll see what I can do!
ReplyDeleteNo, I don't because the way I crochet has the right-side already on the outside. Many people's aren't so they can either choose to turn it before finishing or not. It's up to you and how you prefer it to look :) Good question!
ReplyDeleteThank you for sharing! I changed a couple things in how I made mine, and I balled up some red yarn (and used that for the stuffing...since I can't make it to the market right now). Will be making more of these for sure!
ReplyDeleteI credited your blog in my latest post for the pattern and tutorial!
Thanks again!
Jasmine
http://colourmejasmine.blogspot.com/
Thank you for sharing with me, Jasmine! I love the texture of your heart, very unique! I'm glad you enjoyed the pattern :) Thanks again!!
ReplyDelete